Technical Information
If you're sending us a design to cut as a stencil we ideally require an Ai outline vector drawing file. If you have a little knowledge of Adobe Illustrator please follow our instructions below. On the other hand, if you've fallen into a state of mild technical panic, don't read any further, just send us the largest picture you have.
GET A QUOTE | CUSTOM STENCIL CUTTING SERVICES I CUSTOM STENCILS GALLERY | CUSTOM STENCILS FAQ's
The Technical RequirementsIn Adobe Illustrator or similar, open a new file in RGB colour mode. Position your artwork on an artboard at the size you will need it (max artboard size is 1m wide x 60cm high, this is the largest we can cut your design without splitting it onto separate sheets). All lines should be hairline (line weight 0.001 in Ai) and RGB Red to denote a cut line. Lines which need to be etched or marked onto the stencil should be RGB Black. Check all lines are 100% transparency. Cut lines should not overlap. All cut lines should form a shape that will be removed from the stencil - no open ended paths. All stencil bridges should be at least 1mm wide, all cut shapes should have a space no less than 1mm between them. Finally, add an RGB Green sheet cut line around the outside of your design, there should be at least 3cm border between the design (Red) and the sheet edge (Green) and the green line should be approx 2-3mm smaller than the artboard. Save your work in the latest edition of Ai that you have.  |
Designing your stencilEach shape to be cut out should be whole, meaning that the line you draw should eventually join up at its starting point. Do not overlap shapes.
So, for instance, you have drawn two circles. You place one circle partially over the other circle. Our laser will read the vector lines and cut out the first circle followed by the second, see the illustration below, the dark area represents the hole in the stencil which you will apply paint through.
 Perhaps this is what you wanted? However it is not necessary to cut two circles to achieve this shape, see the illustration below.
 Or perhaps you wanted to show the shape of two circles overlapping? Here are some solutions:
 or this..
 As you can see there are many ways to avoid overlapping cut lines when creating your design. You may want to create your picture or graphic and then add bridges and move elements apart afterwards, or, you can let us do it for you. Whichever way works for you we will always check and amend designs where necessary before cutting so we will advise you if there is a problem.
|
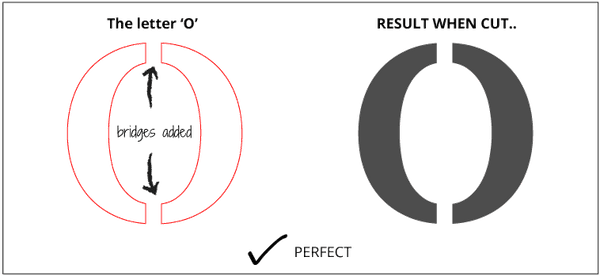
What are bridges and do I need them?Bridges may be required to help keep centres of letters or shapes in place.
For example, the letter 'O' - if we cut the outer edge of the letter out the centre will fall out with it, creating a circle.
 In order to keep the inner part of the 'O' in place we need to leave small joining strips, linking the outside to the inside part of the 'O', we call these 'bridges'. Bridges are an essential part of the stencil, they join elements that would otherwise fall out of the design, and they add stability to the stencil.
 Take the size of the stencil into account when adding bridges (a 3mm bridge is about right for an A4 design). If you're unsure of how to or where to add bridges, don't panic! we can do that part for you.
|
But what if I need a stencil larger than 1m x 60cm?Complete your artwork as above, save at the size you need and we'll take a look, some designs split easily (like text) and some designs will need a lot of work, we'll advise you and quote for the extra work if necessary.
|
