Revamp Your Old Tiled Floor with a Stunning Stencil Design
Are you tired of looking at your old, dull tiled floor? It's time to give it a facelift! With just a reusable stencil and a few easy steps, you can transform your floor into a stunning work of art just like Debbie did. We will show you how Debbie used our Lypiatt Tile Stencil to transform her downstairs loo!
Not only is this DIY project budget-friendly, but it also adds a level of elegance to your home that you never thought possible. Debbie had been quoted for re-tiling the small room but the cost was astronomical so she decided to transform the tiles herself.
In this post, we'll guide you through the simple process of revamping your old tiled floor with a stunning stencil design.
From choosing your stencil design and getting the right size stencil to sealing and protecting your new floor, we've got you covered.
So, let's get started and create a floor that will leave your guests in awe!

STEP 1: Prepare Your Floor
Before you start stencilling your old tiled floor, you need to prepare it properly. Debbie sanded her tiles first and then cleaned them thoroughly using a cleaner /de-greaser. It is important that the tiles are clean and dry before you start.
Apply masking tape around the edge of the room to protect your skirting board.
TOP TIP: Clean and sand your tiles thoroughly before you start. It really will make all the difference.
Debbie wanted to get rid of her old terracotta coloured tiles and give the room a total new look. She tested her colour combination on a old piece of cardboard that she cut to the size of her tile. She wanted to check that she was happy with the colour and the look before she started the project.

TOP TIP: Test out your colours on paper / cardboard to check you like the colour combination.
Debbie actually painted her floor in stages but it is easier to paint the whole of the area with your base colour so you can get started on the stencilling in one go. Debbie did several coats of the base colour using Frenchic Chalk paint in a black.

TOP TIP: Paint the whole area in your base colour and make sure it is thoroughly dry before stencilling.
STEP 3: Stencil Design
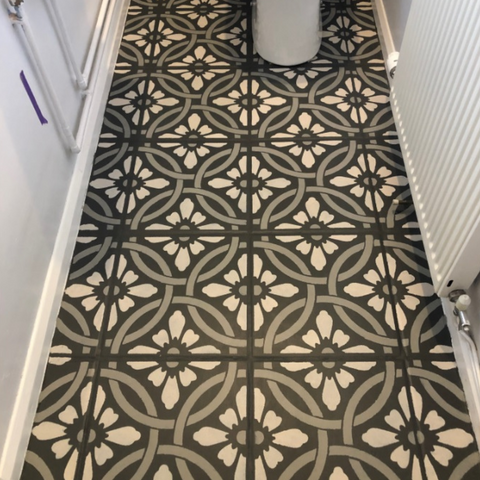
Debbie chose our Lypiatt Tile Stencil for her floor. It is a 2 layer stencil which allows for easy colour separation but it does mean that it takes a bit longer than a 1 layer stencil. However the effect is definitely worth a bit of extra time.

It really doesn't matter which layer of the stencil you start with first. Debbie started with the interlocking circles as her first layer. Simply fix the stencil in place using masking tape so that it doesn't move whilst you stencil. Stencil using either a foam roller or a flat ended stencil brush.
TOP TIP: Always remove excess paint from your roller / brush before stencilling. Best to dab the roller / brush onto some kitchen paper or old newspaper to take off the excess paint. You never want to overload your brush / roller with too much paint as this causes the paint to bleed under the stencil.

TOP TIP: Start stencilling the whole tiles at the far side of the room and work towards the door.
Once the first stencil layer is dry then position and paint the second layer stencil. Debbie painted the stencil using Frenchic Chalk paint in a light grey and cream colour.

Once you have stencilled the whole tiles its time to start the odd sized tiles around the edge of the room. Bend the stencil and use masking tape to hold the stencil in place as its bent up the wall.
TOP TIP: Having a second stencil can be very useful as you can cut it up as required but still have a whole tile stencil just in case you cut off too much!

STEP 4: Seal and Protect Your New Floor
Now that you've successfully stencilled your floor, it's time to seal and protect your new design. The sealing process will not only help your floor last longer but will also make it easier to clean and maintain.
Begin by choosing a sealant that is appropriate for your floor type. If you have a tiled floor, a water-based sealer will work best.
Before applying the sealant, make sure your floor is completely dry and dust-free. Use a microfiber cloth or a vacuum cleaner to remove any dust or debris.
Next, apply the sealant in thin and even coats, using a paintbrush or a roller. Avoid applying it too thickly, as this will lead to uneven drying and a sticky finished surface.
Once you've applied the first coat, allow it to dry completely, following the manufacturer's instructions. Depending on the type of sealant you're using, you may need to apply additional coats.
Finally, allow the sealant to dry completely before walking on the floor. With proper sealing and maintenance, your beautiful stencil design will remain vibrant and durable for years to come.
Revamping your old tiled floor with a stunning stencil design is not only a cost-effective option, but it also adds a touch of sophistication to your home. With the easy-to-follow techniques outlined in this blog, you can create a unique and beautiful floor design that is sure to impress.

So why not start your DIY project today? You have the power to turn your old, tired flooring into a work of art that you can admire daily.
As the saying goes, "make every space count" - and with a stunning stencil design, you'll be doing just that.

Make sure you get the right size tile stencil to fit your existing tiles. Measure your tiles (not including the grout). If you need help then check out our blog that shows you how to measure your tiles and buy the right size tile stencil.

If your tile size is different to our listed sizes then just let us know and we can cut the tile stencil design to fit your existing tiles.
We think it's pretty amazing that with one tile stencil you can transform the look of a whole room. An amazing transformation don't you agree.

- See our full stencil collection here - Buy Stencils online (We ship worldwide).
- Follow us on Pinterest, Instagram and Facebook for more inspiration, stencilling fun and ideas.
- Share your own stencilling projects with us on Instagram or Facebook. Just tag us @thestencilstudio. We love to see your work.
Please feel free to comment below and share this post.